---
title: Creating Workflow
description: Learn to create and configure workflows - automate activities, set triggers, manage activities, and define alerts.

---

import { Aside, Steps } from '@astrojs/starlight/components';
import { MediaPlayerComponent } from "../../../../../components/video-player";
import RunScript from "../../../../../components/RunScript.astro";

# Creating Workflow

<MediaPlayerComponent video="new-creating-workflow-video.mp4"
chapters={
[
  {
    "start": 0,
    "end": 3,
    "text": "Click on Workflows under Automation",
    "description": "From the Infoveave home screen, navigate to the Automation menu in the top bar. From the dropdown, select Workflows to manage and create automated processes."
  },
  {
    "start": 3,
    "end": 9,
    "text": "Create New Workflow",
    "description": "On the Workflows page, click the New Workflow button in the top right corner. In the new workflow configuration panel, name the workflow Acme Banking ETL Flow and add an appropriate description."
  },
  {
    "start": 9,
    "end": 25,
    "text": "Add FTP Download Activity",
    "description": "In the right-hand search bar, type FTP and drag the FTP activity onto the workflow canvas. In its configuration, select phoenix connection as the Connection and set the Working directory to /SFTPtest/Acme. Set Get files for to All."
  },
  {
    "start": 25,
    "end": 34,
    "text": "Add Read Excel Files Activity",
    "description": "Search for Read Excel files in the right-hand panel and drag it onto the canvas, connecting it after the FTP activity. Ensure Read files from previous activity is enabled."
  },
  {
    "start": 34,
    "end": 42,
    "text": "Add JavaScript Transformation Activity",
    "description": "Search for Transform using javascript and drag it onto the canvas, connecting it after the Read Excel activity. Enable Include original. Add a Column map for Loan_ID and apply the transformation (Loan_ID).substring(0, 8)."
  },
  {
    "start": 42,
    "end": 54,
    "text": "Add Round Numbers Transformation",
    "description": "Search for Round numbers and drag it onto the canvas. Connect it after the JavaScript transformation. Configure it to round the revenue_amount column with a RoundingMethod of Round and Precision of 2."
  },
  {
    "start": 54,
    "end": 62,
    "text": "Add Remove Duplicate Rows Activity",
    "description": "Search for Remove duplicate rows and drag it onto the canvas, connecting it to the previous activity. Select customer_id as the column to identify duplicate rows."
  },
  {
    "start": 62,
    "end": 72,
    "text": "Add Drop Columns Activity",
    "description": "Search for Drop columns and drag it onto the canvas. Connect it. Select Loan ID from the Columns to drop list to remove this column."
  },
  {
    "start": 72,
    "end": 84,
    "text": "Add Rename Columns Activity",
    "description": "Search for Rename columns and drag it onto the canvas. Connect it. Add a column map to rename Loan Term (Months) to loan_term__months__."
  },
  {
    "start": 84,
    "end": 94,
    "text": "Add Upload to Datasource Activity",
    "description": "Search for Upload to Datasource and drag it as the final activity in the workflow. Connect it. Select Acme Banking Dataset as the Datasource and Acmebanking as the Table."
  },
  {
    "start": 94,
    "end": 96,
    "text": "Save Workflow",
    "description": "Click the Save button in the top right corner of the screen to save the complete Acme Banking ETL Flow workflow."
  },
  {
    "start": 96,
    "end": 101,
    "text": "Run Workflow",
    "description": "Click the Play icon in the top toolbar to initiate the workflow execution. Confirm by clicking Yes in the prompt."
  },
  {
    "start": 101,
    "end": 117,
    "text": "Monitor Workflow Execution",
    "description": "Observe the 'Workflow logs' panel on the left."
  },

]


}
poster="/images/introduction-poster.png"
posterText="Creating Workflow in Infoveave"
client:load/>


Infoveave workflows let you automate and streamline your data processes. These processes range from ingestion to visualization. A workflow is a sequence of connected activities that automates business-critical tasks such as data acquisition, analysis, and reporting.


## Creating an Infoveave Workflow
<Steps>  
1. Access Infoveave Workflows by going to **Automation** <i class="fa-duotone fa-regular fa-arrow-right"></i> **Workflows**. 
   
   You can see all workflows created by you under **My Workflow** and those shared with you under **Shared Workflow**.  
2. To create a new workflow, click **New Workflow**. This takes you to the Workflow Designer.  
   ![New Workflow](/images/Automation/Workflows/Creating-Workflow/create-new-workflow.png)  
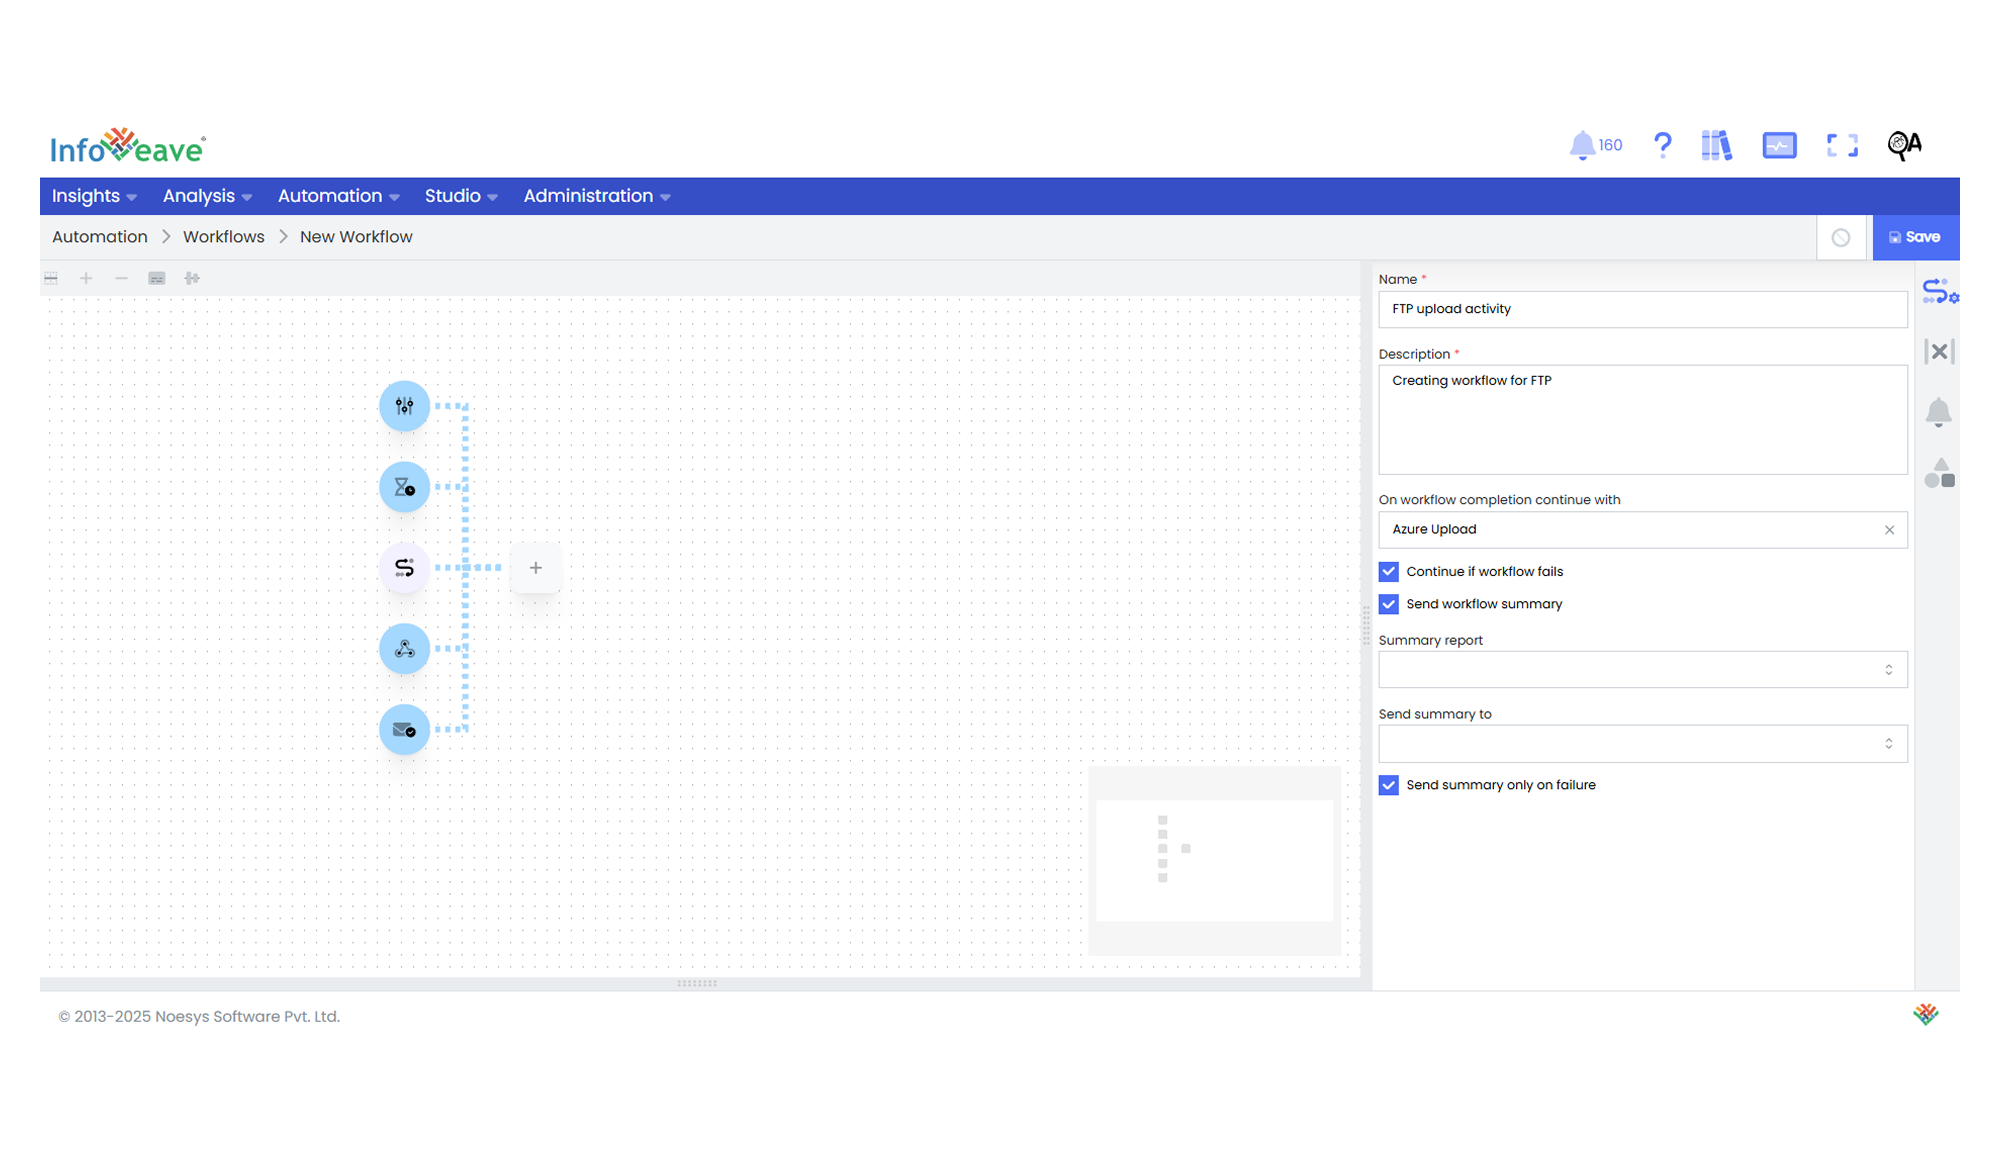
3. In the **Workflow Setup** tab, enter a meaningful **Name** and **Description**. These help you identify the workflow and understand its purpose.  
4. Choose what should happen after the workflow finishes by selecting an option from the **On workflow completion continue with** dropdown.  
5. You can enable the **Continue if workflow fails** checkbox if you want the workflow to continue running even if one or more activities fail.  
6. To get a summary report after the workflow runs, check the **Send workflow summary** box. This report gives you an overview of the workflow’s execution.  
7. Select a summary report (query report) from the dropdown list.  
8. Specify who should receive the summary report for review and analysis.  
9. Optionally, check the **Send summary only on failure** box to receive the summary report only when the workflow encounters failures. This helps you with monitoring and troubleshooting.  
10. Click **Save** to save your workflow.  
</Steps>

<Aside>  
* Make sure you provide a name and description before saving the workflow.  
* Remember to save your workflow after making any changes. Updates are not saved automatically.  
</Aside>

## Starting a Workflow

To learn more about starting a workflow, visit [Workflow Start](/automation-v8/workflows/define-workflow/workflow-start/).


## Adding, Configuring and Linking Activities

Identify the key activities in your workflow and add them to the Workflow Designer. These activities define how your workflow functions.
<Steps>
1. Drag and drop the required activity from the activity panel onto the **Workflow Designer** canvas. Each activity performs a specific task in your workflow.  
2. To configure an activity, select it to view its settings in the **Configuration** tab. The selected activity is highlighted on the canvas.  
3. To add variables to your workflow that can be used anytime, go to the **Variables** tab in the **Workflow Setup panel**.  
   * Click **Add** to create a new variable.  
   * Enter a unique and descriptive name.  
   * Select the variable type from String, Number, Boolean, Date, or JSON.  
   * Set the initial value depending on the variable type.  
   * For Boolean, choose either True or False.  
   * For Date, select a date using the calendar.  
   * For JSON, enter a JSON array.  
   * Click **Save** to save the variable.  
4. After configuring an activity, click **Validate**.  
5. Link all the necessary activities to complete your workflow.  
6. Use the mini map to navigate through the **Workflow Designer** canvas.  
7. To add alerts that send email notifications during the workflow, go to the **Alerts** tab in the **Workflow Setup panel**.  
   * Toggle **Enable** to turn the alert on or off.  
   * Select recipient email addresses from the user list. You can choose multiple recipients.  
   * Write a custom alert message that is sent when the condition is met.  
   * When setting an execution time alert, toggle **Use Absolute Time** to choose between absolute and relative time.  
     * **Absolute Time** measures total execution time in minutes.  
     * **Relative Time** measures time based on a specific event or condition.  
   * When setting data alerts, define the conditions for input and output data.  
     * **Input Rows** lets you choose whether to send alerts for input rows. Options are Send or Don’t send.  
     * **Input Files** lets you choose whether to send alerts for input files. Options are Send or Don’t send.  
     * **Output Rows** lets you choose whether to send alerts for output rows. Options are Send or Don’t send.  
     * **Output Files** lets you choose whether to send alerts for output files. Options are Send or Don’t send.  
8. Click **Save** to save the configured workflow.  
</Steps>

<Aside>  
* To learn more about variables, visit [Workflow variables](/automation-v8/workflows/define-workflow/workflow-variables/).    
* To learn more about alerts, visit [Workflow Alerts](/automation-v8/workflows/define-workflow/workflow-alerts-2/).  
</Aside>