---
title: Managing Infoboards
description: Create, customize, and share Infoboards easily, manage data visualization with templates, widgets, and advanced configuration options.
---
import { Aside, Steps } from '@astrojs/starlight/components';
# Managing Infoboards
**Infoboard** in Infoveave lets you easily configure, create, share, edit, and manage your Infoboards. This guide provides a detailed overview of how to use Infoboards effectively.
## Viewing an Infoboard
To learn how to view an Infoboard, visit [Viewing Infoboard](/insights-v8/create-infoboard/viewing-infoboard) .
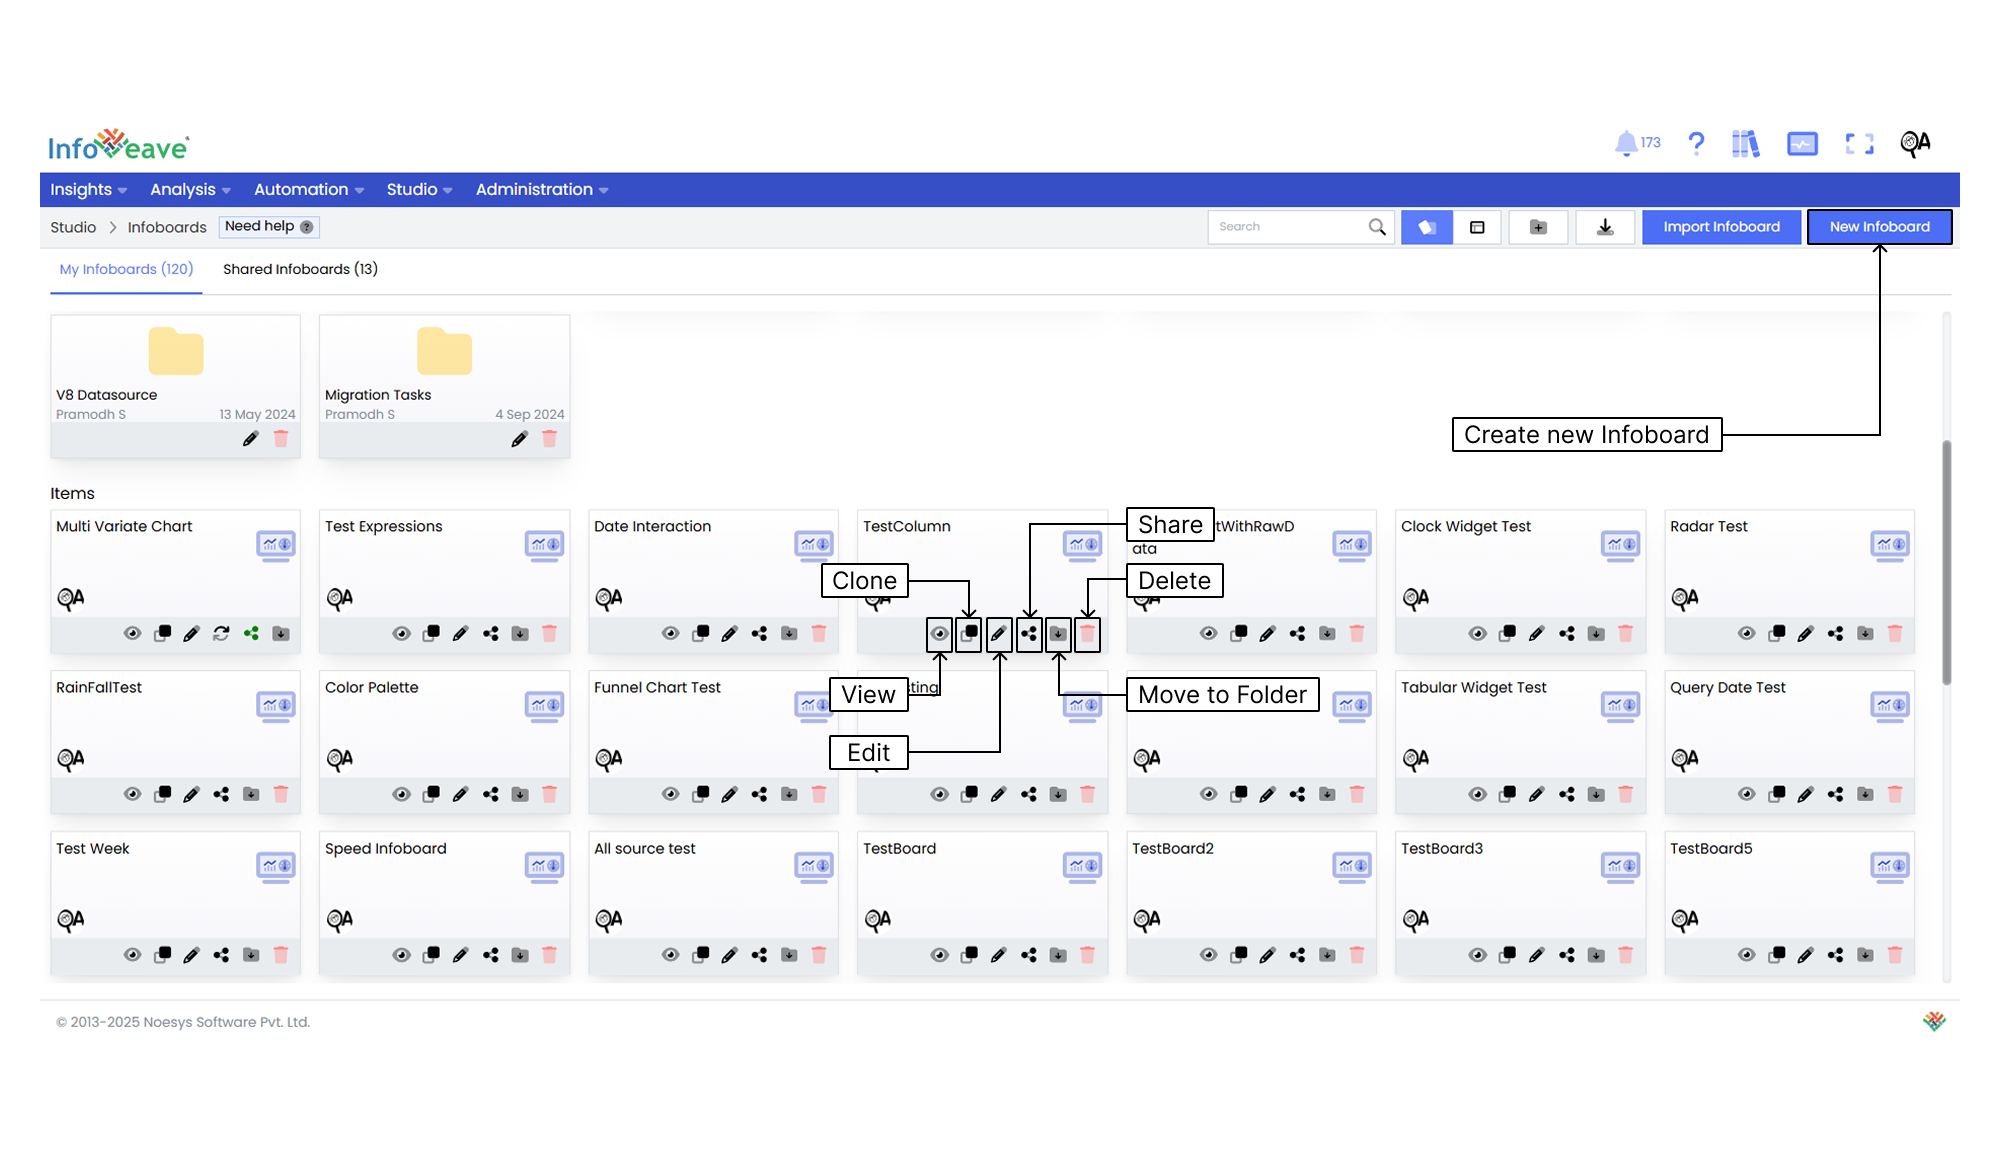
## Cloning an Infoboard
Cloning Infoboards in Infoveave helps you save time and effort. It is especially useful when you want similar data presentations with only minor differences.
1. Navigate to **Studio Infoboards**.
2. Find the Infoboard you want to clone.
3. Click the **Clone** icon for that Infoboard. A prompt appears where you enter a name for the cloned Infoboard.
4. Enter the name for the cloned Infoboard.
5. Click **Save** to create the cloned Infoboard. It now appears in your list of Infoboards. You can customize it by adjusting settings, filters, date ranges, or other configurations as needed.
## Editing an Infoboard
To edit an Infoboard in Infoveave, follow these steps.
1. Navigate to **Studio Infoboards**.
2. Find the Infoboard you want to edit.
3. Click the **Edit** icon. You return to the designer view.
4. Update the widgets to make the Infoboard more relevant and descriptive if needed.
5. Update the date range if required. Choose from
* **Default** uses the default date settings.
* **Fixed Dates** lets you set a specific date range.
* **No Date** removes the date range filter.
6. Edit any workflows linked to the Infoboard if needed.
7. Update the Infoboard’s Dimension Filters or select a new one.
8. Click **Save** to apply your changes.
## Sharing an Infoboard
To share your Infoboard or widget outside your organization, visit [Share Infoboard or Widget publicly](/insights-v8/create-infoboard/viewing-infoboard/#share-an-infoboard-or-widget-publicly).
Sharing with specific users or roles in your organization gives you control and flexibility. It ensures your Infoboards reach the right audience.
To share your Infoboards internally
1. Navigate to **Studio Infoboards**.
2. Click the **Share** icon for the Infoboard.
3. Choose between **Share with User** or **Share with Role**.
4. If you choose to share with specific users, select the user(s) you want.
5. To share with all users, select **Share With Everyone**.
6. If you choose to share with roles, select the roles from the dialog box.
7. To remove users or roles, uncheck their corresponding checkboxes.
8. Click **Save** to complete the sharing process.
## Moving an Infoboard to a Folder
You can keep your Infoboards organized by moving them into designated folders.
To move an Infoboard into a folder
1. Navigate to **Studio Infoboards**.
2. Click the **Move to Folder** icon for the Infoboard(s) you want to move.
3. Select the destination folder from the dropdown.
4. Click **Save** to confirm the move.
## Deleting an Infoboard
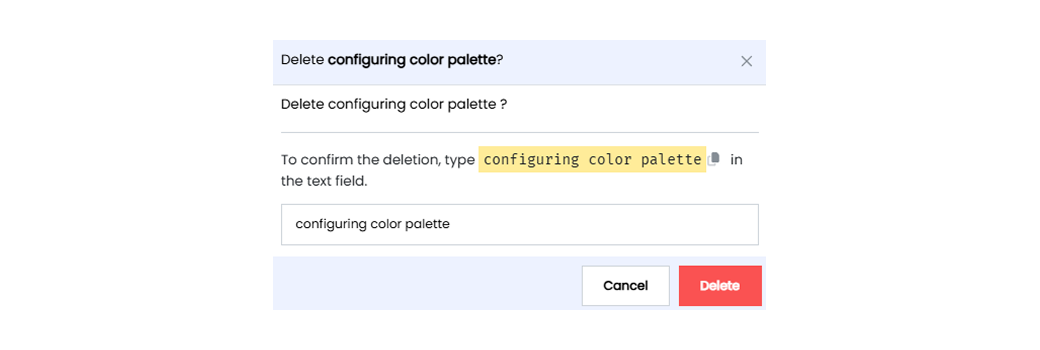
To delete an Infoboard in Infoveave, follow these simple steps.
1. Navigate to **Studio Infoboards**.
2. Locate the Infoboard you want to delete.
3. Click the **Delete** icon.
4. Type the specified text from the warning message into the text field.
5. Alternatively, copy the text from the icon and paste it into the field.
6. Once the correct text is entered, click **Delete**.