---
title: Query Builder
description: Easily create, customize, and execute queries using drag-and-drop, JOINs, WHERE conditions, and more, explore advanced query features.
---
import { Aside, Steps } from "@astrojs/starlight/components";
# Query Builder
The Query Builder in Infoveave is a UI-driven tool designed for writing and executing SQL queries over various Datasources. It offers a user-friendly interface where you can drag and drop columns, apply filters, perform operations such as JOIN operations and aggregation functions, and set conditions without needing extensive SQL knowledge.
## Creating queries using the Query Builder
Streamline the process of formulating queries over existing Datasources in Infoveave to efficiently customize, analyze, and modify data. Derive meaningful insights from complex datasets.
1. To build a query in Infoveave over any existing Datasource using the Query Builder, click on **Studio** **Queries**. All queries created by you or shared with you are displayed under the tabs **My Queries** and **Shared Queries** respectively.
2. To formulate a new query, click on **New Query.**

3. Select the **Query Builder** option to start building the query using the Query Builder.
4. Select the **Datasource** you want to use from the drop-down list and click the **Continue** button.
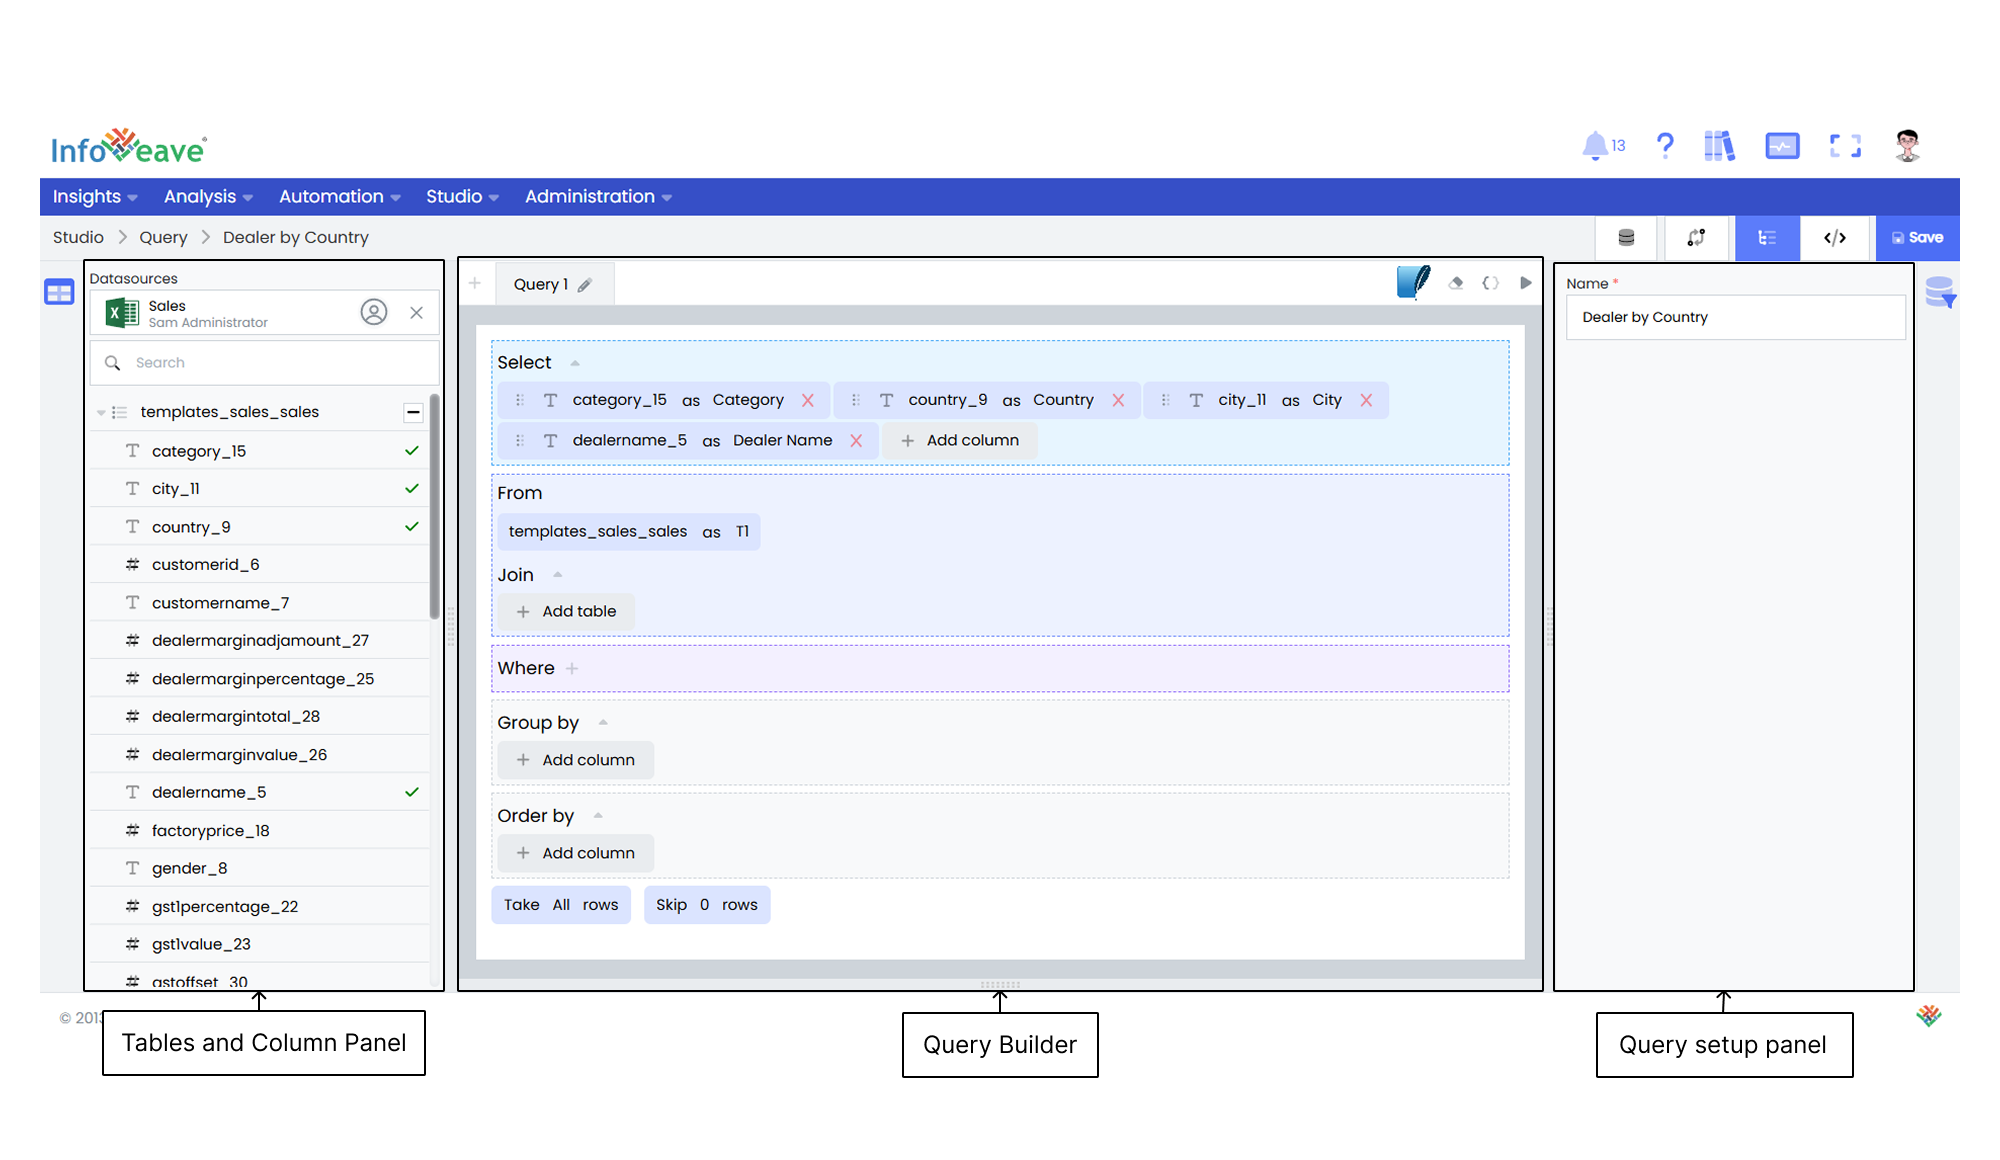
The Infoveave Query Builder layout is divided into three sections. These are the Tables and Column Panel, the Query Builder, and the Query Setup Panel. By understanding these components, you can efficiently navigate and use the Query Builder.
#### Table and Column Panel
- **Datasource** The Datasource option helps you make the required changes to the Datasource such as adding multiple tables and establishing relationships between them.
- **Search** The Table and Column Panel includes a search option that allows you to quickly find specific tables or columns by entering column or activity names in the search bar. This helps streamline the activity selection process, especially when you work with a large number of activities.
- **Drag and drop** The Table and Column Panel offers a convenient drag-and-drop functionality. You can simply select and drag the desired column from the panel onto the Query Builder. This intuitive feature simplifies the process of adding activities to your Workflow design and enhances productivity.
- **Select All** Checkbox the table in the Table and Column Panel to add all the columns from a table to the Query Builder in a single go.
- **Change Datasource** The Table and Column Panel allows you to select a different Datasource than the already selected one at any time.
5. Double-click or drag and drop the columns required from the tables. You can also click on the **+ Add column** button to choose the required columns from the table.
6. To define the column aggregation type (e.g., SUM, COUNT, DISTINCT) and alias, click on the required column name that is added and enter the desired aggregation and alias.
The Query Builder interface allows you to create SQL queries visually. Here is a breakdown of the different sections and how to use them.
**Select**
Choose the columns you want to include in the query. To select columns, follow these steps.
1. Click on the **+ Add column** button and select the columns from the dropdown that appears.
2. Manually drag and drop the columns or double-click on the column names to add them.
3. To define the column aggregation type and alias, click on the column name and add the aggregation type and alias to the column name. Example **DISTINCT(T2.category_15)**, where **DISTINCT** is the aggregation type, **T2** is the table alias, and **category_15** is the column name.
4. To clear the changes made to the column including the aggregation and the alias, click on the **Clear all** icon.
5. To view the created query, click on the **Generate Query** icon.
6. To execute the created query, click on the **Execute** icon.
7. Click on the **Save** icon associated with the column name to save the changes made.
**From**
Specify the tables from which to retrieve the data.
1. The table name is automatically added based on the column selected.
2. To change the table, click on the table name and select the required table from the available options. You can also change the table alias if required.
3. Click on the associated **Save** button to save the changes made.
**Join**
The Join section in the Query Builder allows you to join two or more tables using key columns.
1. Click on the **+ Add Table** button to select the available tables to perform the JOIN operation.
2. Once the table is selected, click on the selected table to define the join type from INNER JOIN, FULL JOIN, LEFT JOIN, and RIGHT JOIN. Also define the table alias. By default, the table alias is assigned based on the order of the table.
3. Select the key columns from the tables for the JOIN operation. Switch from column to value when applying fixed conditions by selecting another column or entering the value for comparison.
4. To switch from the column option to an expression, click on the associated **fx** option.
5. To add a rule or condition to the JOIN statement, click on the **+ Add rule** icon. You can switch from column to value when applying conditions.
6. Click on the associated **+ Add group** icon to add a nested condition or group to the JOIN statement. Switch between NOT, AND, OR conditions by clicking on the respective buttons when adding rules or nested conditions. To change the operator for rules and nested groups, click on the operator symbol (=).
7. Click on the **Clear all** icon to remove any changes made to the JOIN statement.
8. Click on **Save** to save the individual statements, rules, and conditions.
**Where**
Apply the WHERE condition to return the values that meet the specified conditions.
1. To add a WHERE condition, click on the associated **+** icon to select the available column to apply the WHERE condition.
2. Once the column is selected, click on the operator function to change it accordingly.
3. To switch from column option to expression, click on the associated **fx** option.
4. To add a rule or condition to the WHERE statement, click on the **+ Add rule** icon.
5. Switch from column to value when applying fixed conditions by selecting another column or entering the value for comparison.
6. Click on the associated **+ Add group** icon to add a nested condition or group to the WHERE statement.
- Switch between NOT, AND, OR conditions by clicking on the respective buttons when adding rules or nested conditions.
- To change the operator for rules and nested groups, click on the operator symbol (=).
7. Click on the **Clear all** icon to remove any changes made to the WHERE statement.
8. Click on **Save** to save the individual statements, rules, and conditions.
**Group by**
Group rows that have the same values in specified columns into aggregated data.
1. To add a GROUP BY condition, click on the **+ Add column** button.
2. Select the column you want to GROUP BY. You can add multiple columns to GROUP BY.
**Having**
Apply the HAVING condition defined by the GROUP BY clause. It is used with aggregate functions such as COUNT and SUM.
1. To add a HAVING condition, click on the associated **+** icon to select the available column to apply the HAVING condition.
2. Once the column is selected, click on the operator function to change it accordingly.
3. To switch from column option to expression, click on the associated **fx** option.
4. To add a rule or condition to the HAVING statement, click on the **+ Add rule** icon.
5. Switch from column to value when applying fixed conditions by selecting another column or entering the value for comparison.
6. Click on the associated **+ Add group** icon to add a nested condition or group to the HAVING statement.
- Switch between NOT, AND, OR conditions by clicking on the respective buttons when adding rules or nested conditions.
- To change the operator for rules and nested groups, click on the operator symbol (=).
7. Click on the **Clear all** icon to remove any changes made to the HAVING statement.
8. Click on **Save** to save the individual statements, rules, and conditions.
**Order by**
Order the rows based on the values in specified columns.
1. To add an ORDER BY condition, click on the **+ Add column** button.
2. Select the column you want to ORDER BY. You can add multiple columns to ORDER BY.
7. Click on the **+ Add table** button to select additional tables for the JOIN operation.
8. Click on the selected table to specify the join type (INNER, FULL, LEFT, RIGHT) and assign a table alias.
9. Add the WHERE condition to apply filters as required.
10. Click on the **+ Add column** button to add columns you want to GROUP BY.
11. Add the HAVING condition to apply filters over the aggregation function as required.
12. Click on the **+ Add column** button to add columns you want to ORDER BY.
13. To view the created query, click on the **Generate Query** icon.
14. To execute the query, click on the **Execute** icon.
15. Save your query with a meaningful name for easy identification and differentiation.