---
title: Managing NGauge Forms
description: Efficiently manage NGauge Forms in Infoveave - customize, share, organize, and update entries with options for detailed control.
---
import { Aside, Steps } from '@astrojs/starlight/components';
# Managing NGauge Forms
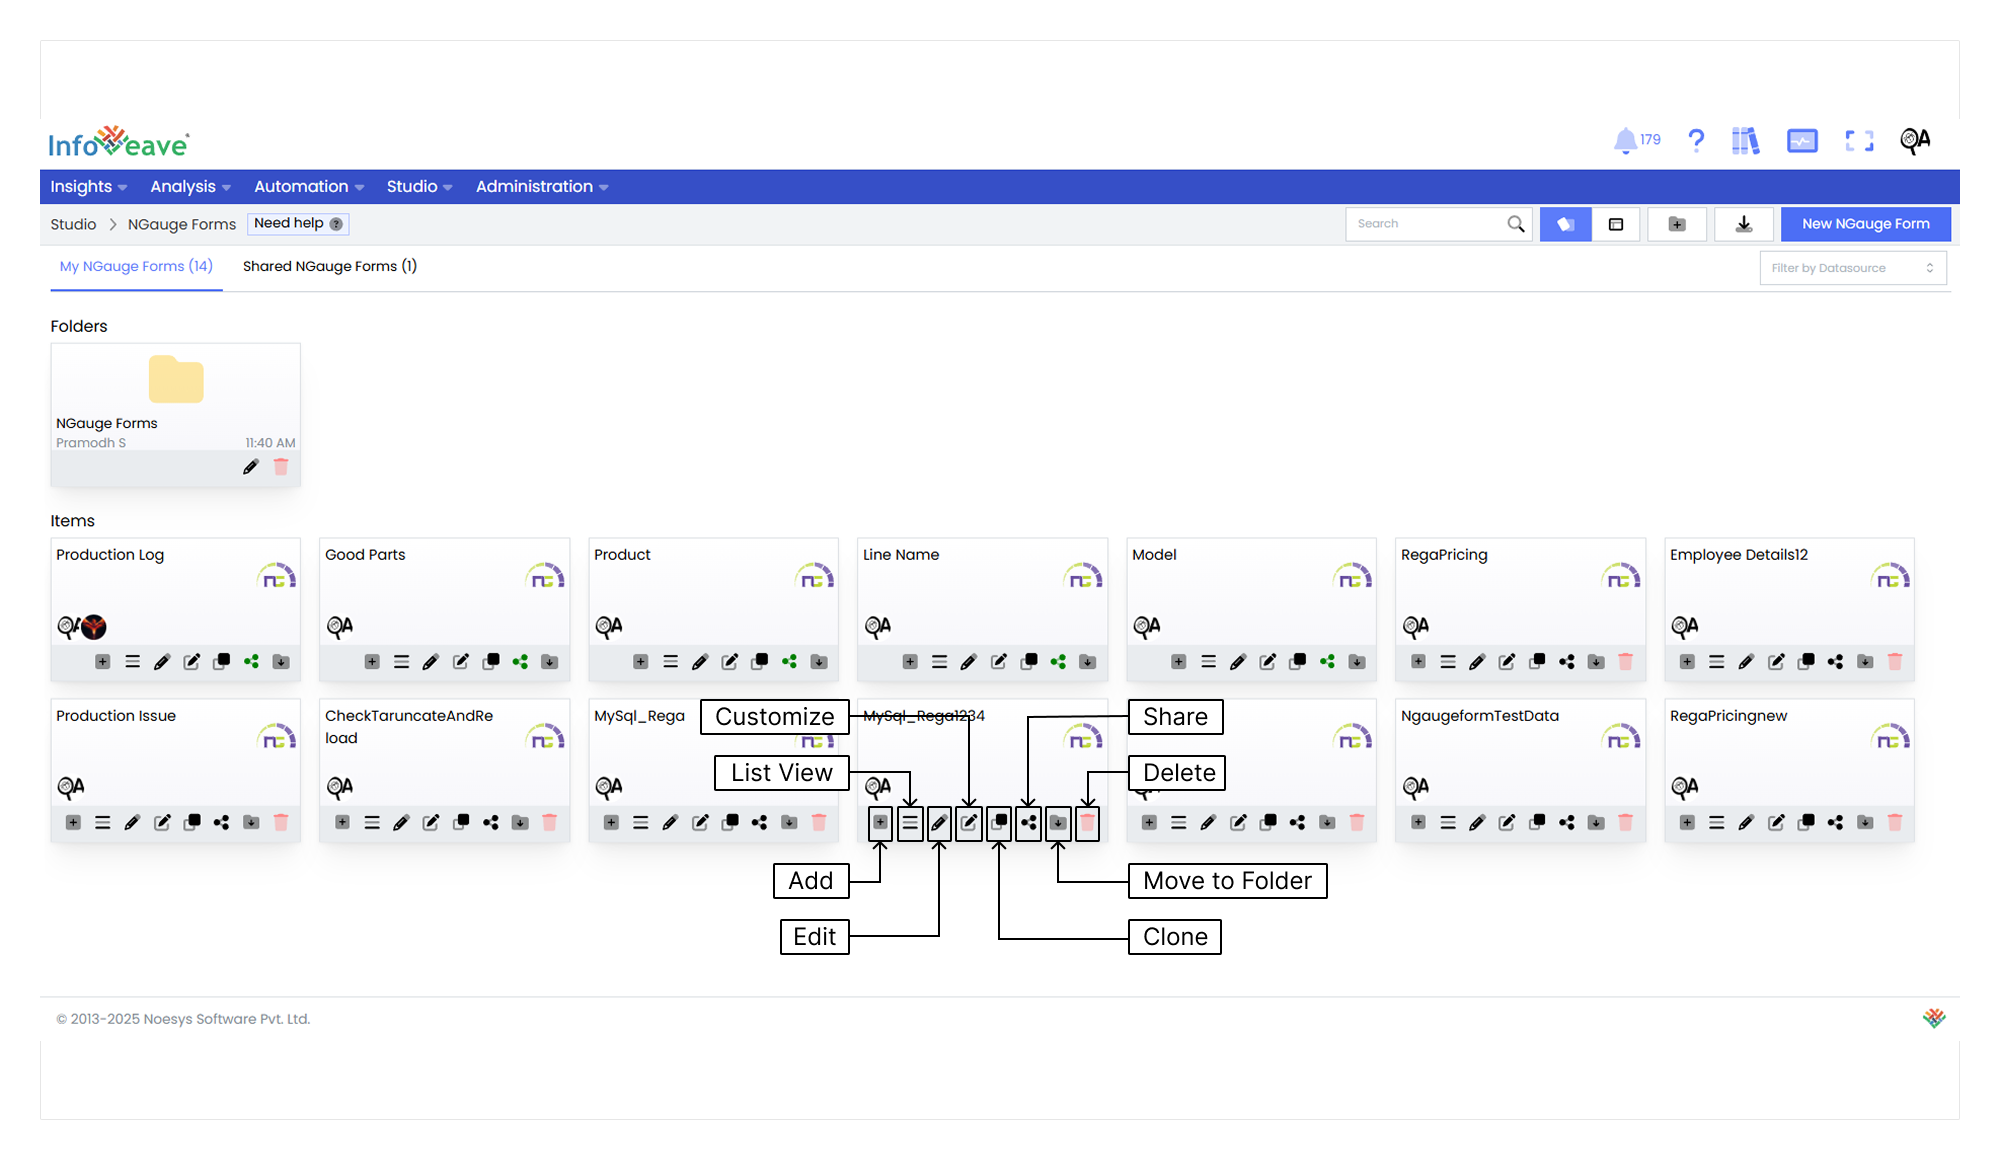
The **Manage NGauge Forms** feature provides complete control over your forms. It allows you to organize, customize, and share them efficiently. Below is a brief overview of the various options available for managing your NGauge forms.
You can manage your NGauge forms with options such as **List View, Edit, Share, Move to Folder and Delete.**
## Adding a New NGauge Form Entry
NGauge forms in Infoveave allow you to collect and manage data in a structured manner. You can easily add new entries or rows to an NGauge form using the **Add** feature.
To add a new row entry to the NGauge form in Infoveave, follow these steps.
1. Navigate to **Studio NGauge Forms**.
2. Find the specific NGauge form where you want to add a new entry.
3. Click on the **Add** icon associated with the NGauge form.
4. After entering the required information in the provided fields, click on the **Save** button to save your entry.
## Using the List View
List View allows you to manage and interact with the entries in your NGauge form in a convenient and efficient way. Follow the steps below to use this functionality.
1. Navigate to **Studio NGauge Forms**.
2. Find the specific NGauge form you want to view.
3. Click on the **List View** icon associated with the NGauge form.
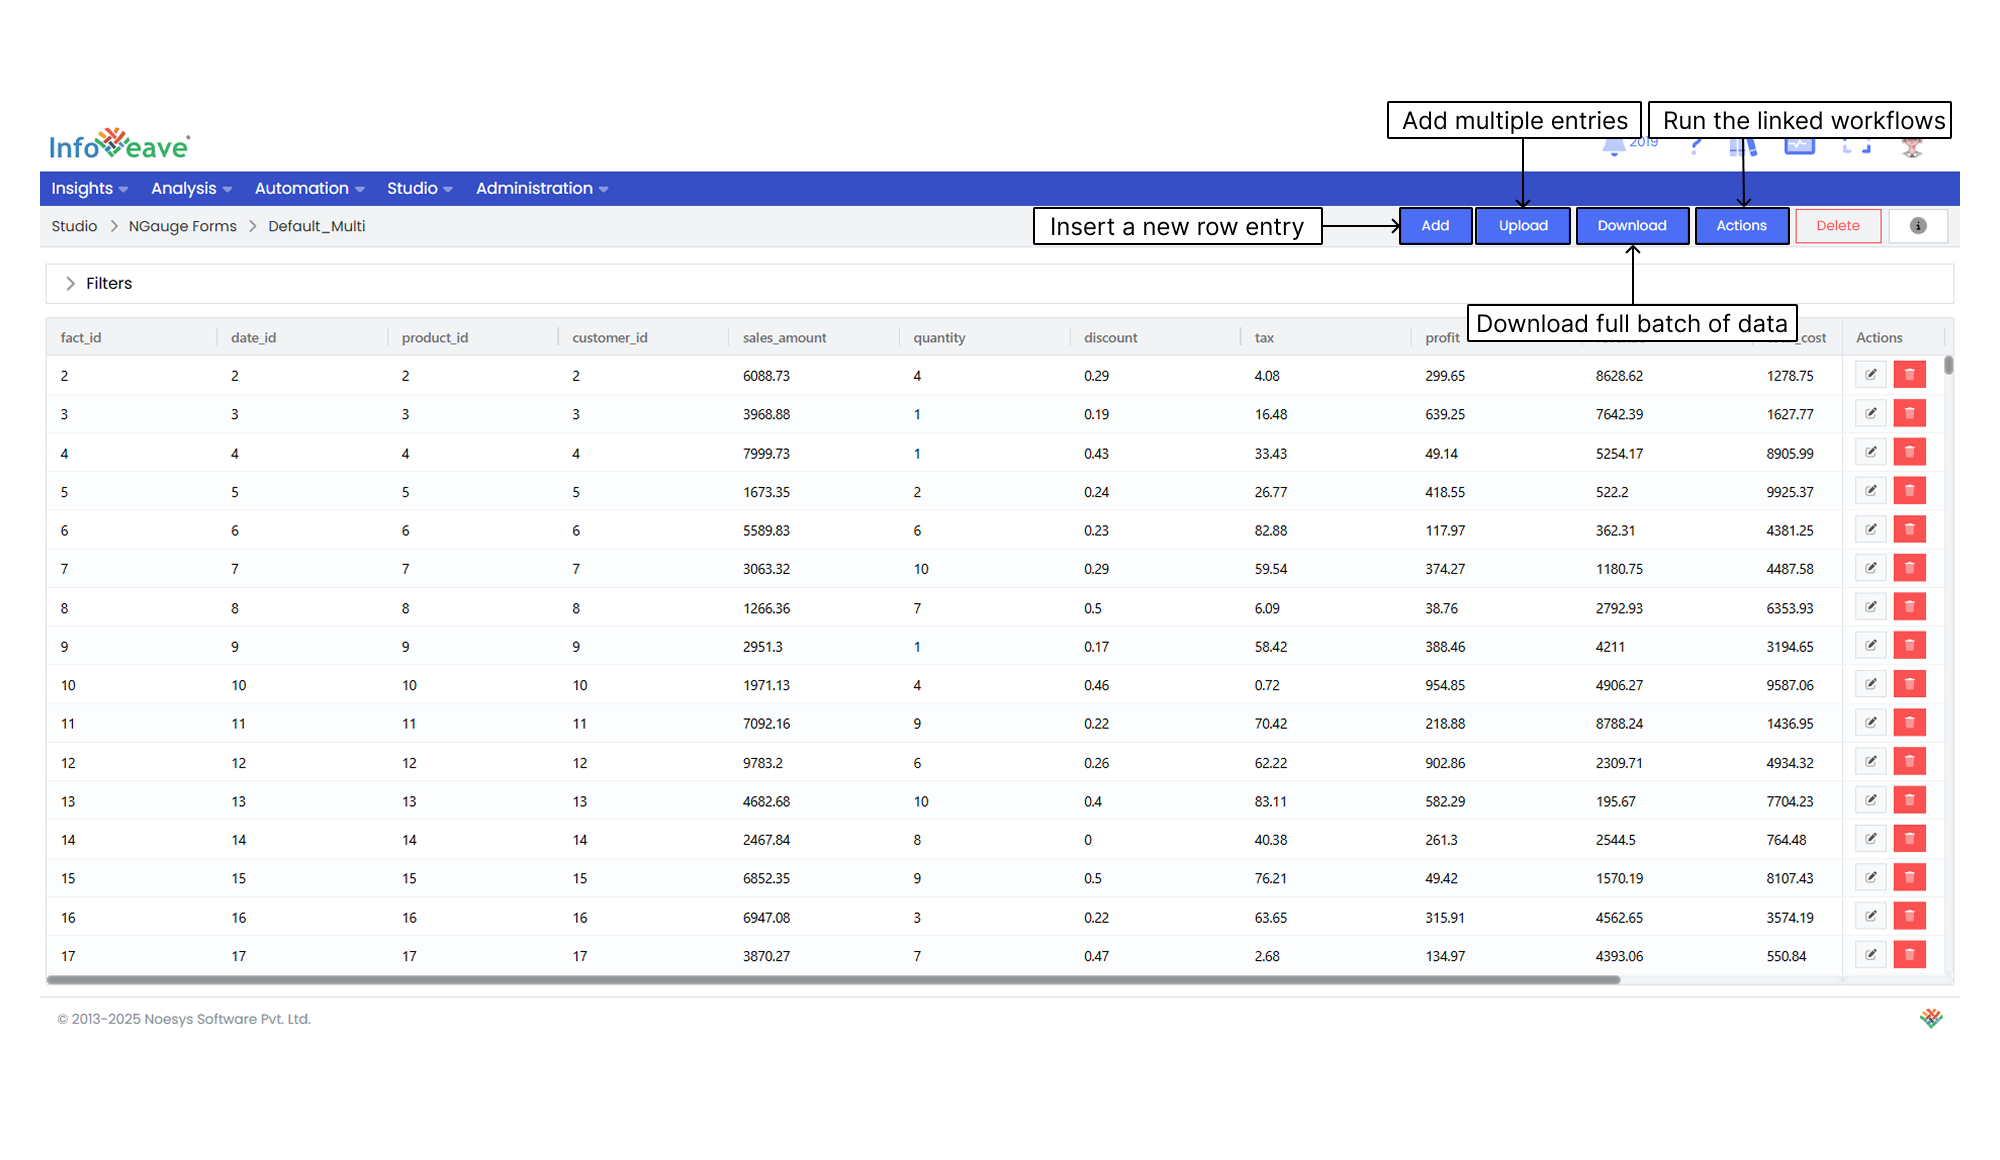
4. To insert a new row entry into your NGauge form's Datasource, click the **Add** button. This opens a new row for you to input data.
5. Modify individual row entries by selecting the **Edit** option. This allows you to update any information directly in the NGauge form.
6. To remove a specific row, click the **Delete** option associated with that entry. This permanently removes the selected data.
7. Add multiple entries by using the **Upload** option. You can upload a batch of data into your NGauge form’s Datasource.
8. To run workflows linked to the NGauge form, click on the **Actions** button and select the workflow you want to execute.
9. To download the full batch of data, click the **Download** option.
10. To delete the full batch of data, click the **Delete** option.
## Editing an NGauge Form
Edit your NGauge form to reflect any updates or changes as your requirements evolve.
To modify an NGauge form in Infoveave, follow these steps.
1. Navigate to **Studio NGauge Forms**.
2. Find the specific NGauge form you want to edit.
3. Click on the **Edit** icon associated with the form.
4. Make the necessary changes and click the **Save** button to apply your edits.
## Customizing the NGauge Form Layout
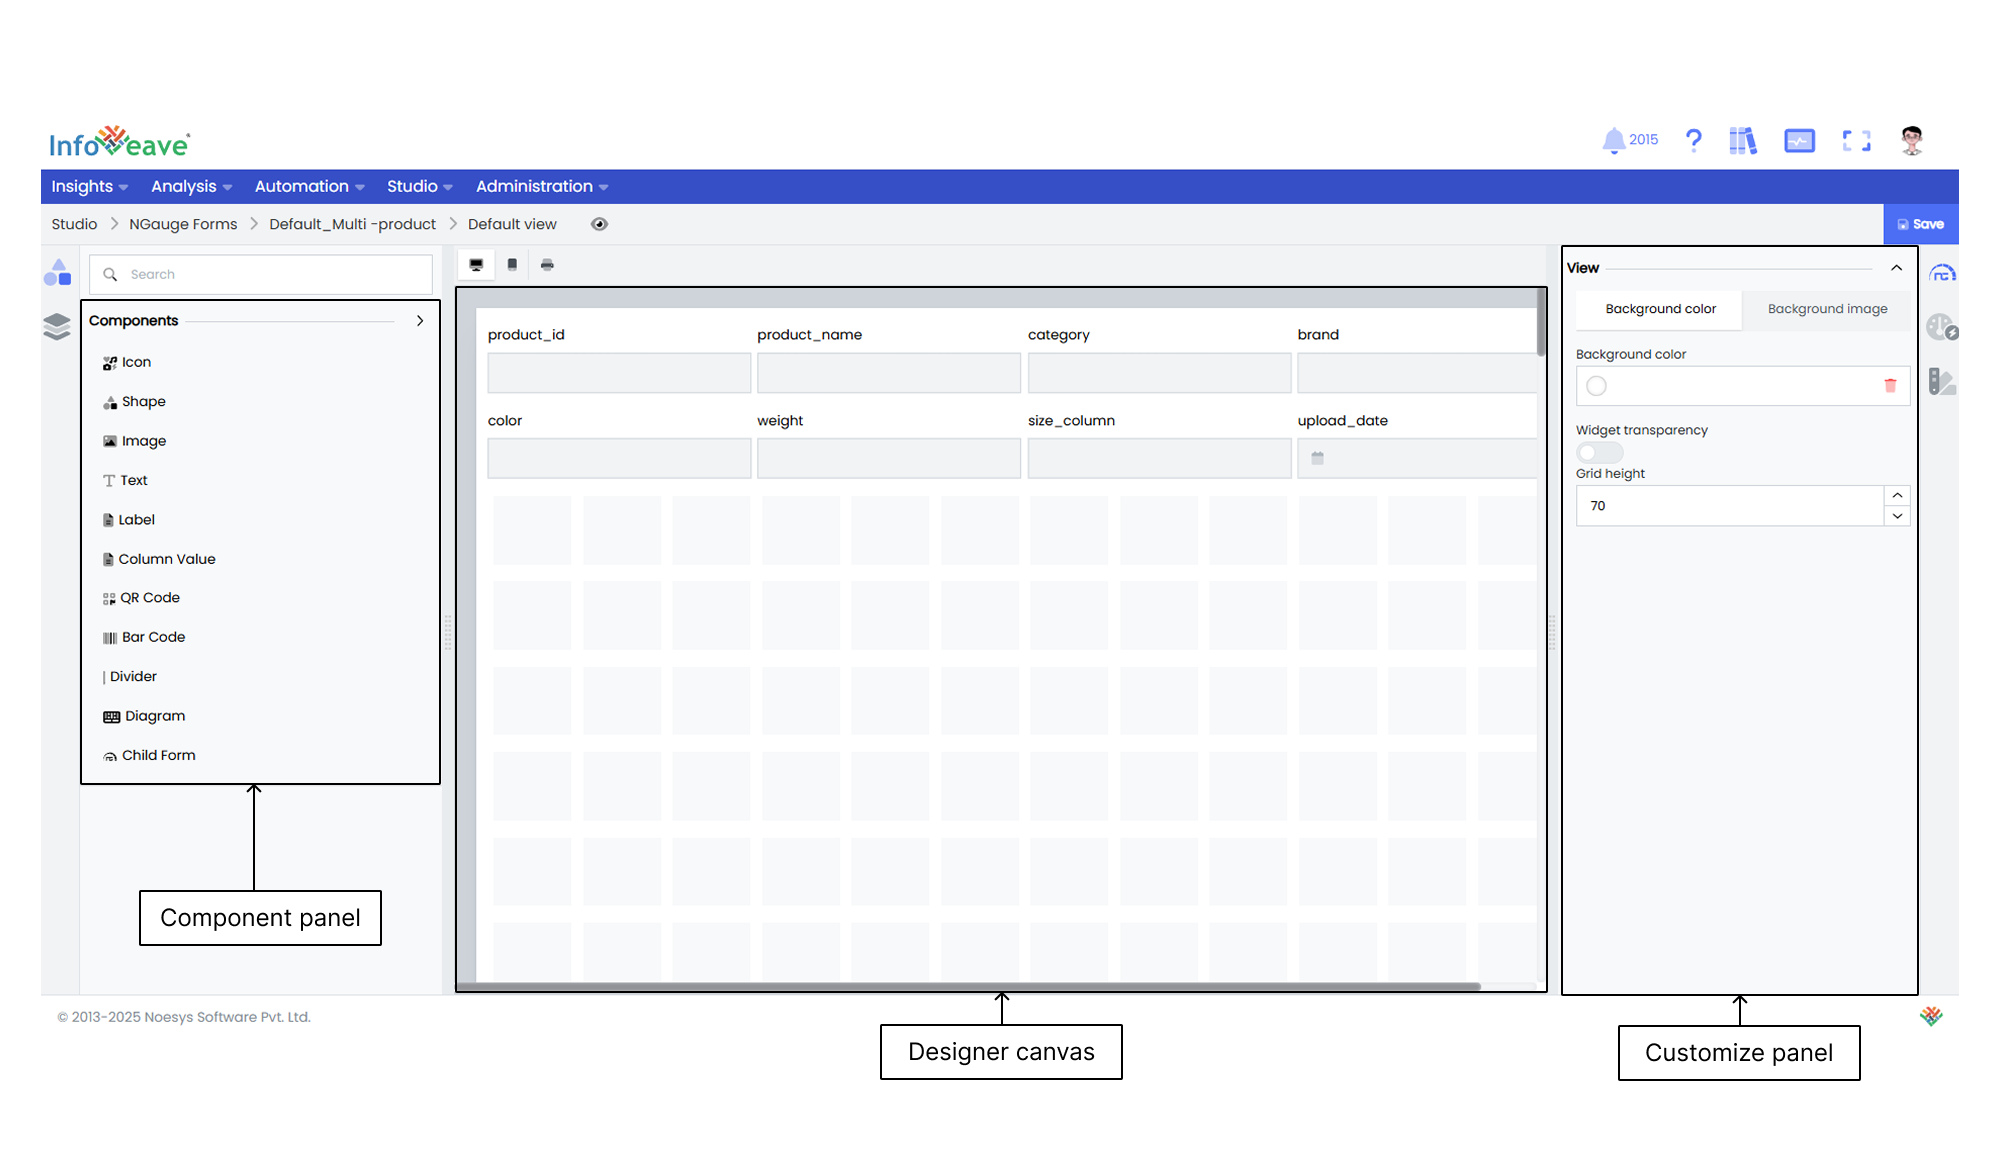
Customize allows you to manage and personalize your NGauge form layout. The customization interface includes three key sections.
1. **Component Panel** Access a variety of components for your NGauge elements.
2. **Designer Canvas** This is your main workspace for arranging elements using a drag-and-drop interface.
3. **Customize Panel** Use this panel to fine-tune properties such as colors, sizes, fonts, and other settings. It also offers advanced configuration options.
To learn more about customizing layout, visit [Customizing NGauge Form Layout](/data-application/ngaugeforms-summary#customizing-an-ngauge-form-layout).
## Cloning an NGauge Form
The **Clone** option lets you create a duplicate of an existing NGauge form. By clicking the **Clone** icon , a copy of the form is created with the same fields, settings, and configurations.
## Sharing an NGauge Form
Sharing options in NGauge forms, such as user and role-based sharing, allow you to distribute your form to the intended audience efficiently.
To share an NGauge form in Infoveave, follow these steps.
1. Navigate to **Studio NGauge Forms**.
2. Click the **Share** icon .
3. Choose between **Share with User** or **Share with Role**.
4. If sharing with users, select the user(s) from the list.
5. To share with all users, select the **Share with Everyone** option.
6. If sharing with roles, pick the roles from the share dialogue box.
7. To remove a user or role from the shared list, uncheck the corresponding box.
8. Click **Save** to apply the changes.
## Moving an NGauge Form to a Folder
Organize your NGauge forms by moving them into folders.
To move an NGauge form into a folder, follow these steps.
1. Navigate to **Studio NGauge Forms**.
2. Click the **Move to Folder** icon on the NGauge form.
3. Choose the target folder from the dropdown menu.
4. Click **Save** to confirm the move.
## Deleting an NGauge Form

To delete an NGauge form in Infoveave, follow these steps.
1. Navigate to **Studio NGauge Forms**.
2. Locate the NGauge form you want to delete.
3. Click on the **Delete** icon .
4. Enter the specified text in the input field.
5. Alternatively, copy the text from the icon and paste it into the field.
6. Click **Delete** after entering the correct text.