---
title: Infoveave Menu
description: Navigate menu to explore data insights, perform analysis, automate activities, and manage system settings efficiently.
---
import { Aside, Steps } from '@astrojs/starlight/components';
# Infoveave Menu
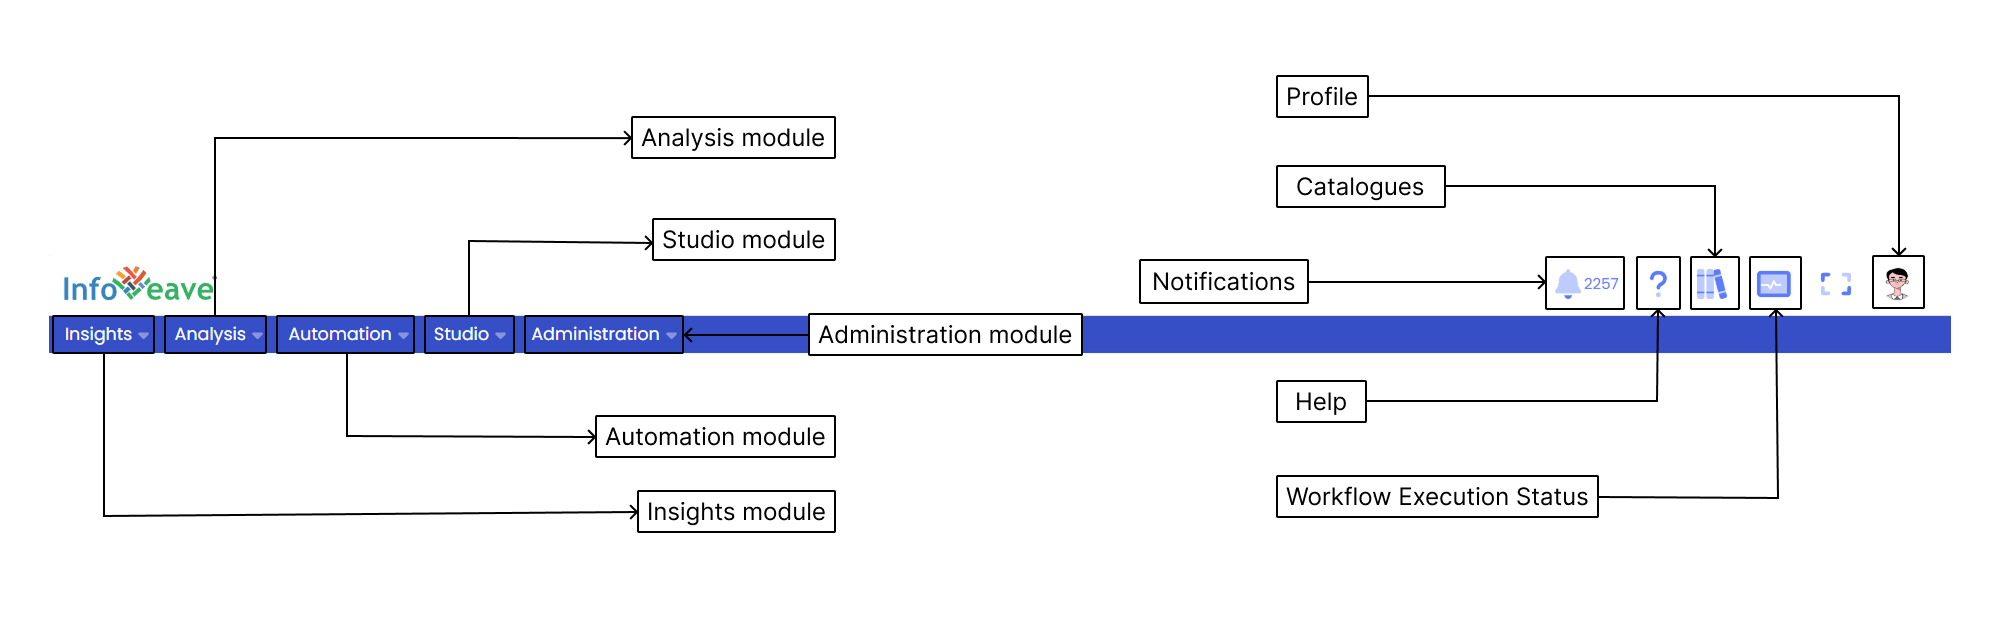
The Infoveave menu is the central hub of the Infoveave platform, offering easy access to various modules, each designed to serve a specific purpose. This overview helps you understand the purpose of each module and how to navigate them effectively.
## Insights
The Insights module allows you to explore data and gain valuable insights.
Follow these steps to navigate the Insights module
1. Click on the [Insights](/insights-v8/insights-layout/) module in the Infoveave menu.
2. Inside the module, you will find **My Organization** and **My Workspace** sections.
3. Select the desired section and folder to continue.
4. Inside the folder, access **Infoboards**, **Reports**, and **Lists**.
5. Click on **Create Infoboard** to create a new Infoboard.
6. Click on **Chat with Fovea** to get help from Fovea.
7. Use the search bar to locate specific Infoboards, Reports, or Lists.
## Analysis
The Analysis module is designed for advanced data analysis.
Follow these steps to navigate the Analysis module
1. Click on the [Analysis](/analysis-v8/) module in the Infoveave menu.
2. Access sections such as [What-If Formulae](/analysis-v8/what-if-formula-v8/), [What-If Analysis](/analysis-v8/what-if-analysis-v8/), [ML Models](/analysis-v8/ml-modeller/), and [SciPyR](/analysis-v8/scipyr-custom-analysis-v8/).
3. Click on the section you want to explore.
## Automation
The Automation module helps you streamline activities and automate processes.
Follow these steps to navigate the Automation module
1. Click on the [Automation](/automation-v8/) module in the Infoveave menu.
2. Inside the module, find sections like [Workflows](/automation-v8/workflows/), [Targets & Thresholds](/automation-v8/targets-and-thresholds/), and [Alerts](/automation-v8/workflows/define-workflow/workflow-alerts-2/).
3. Click on the section you want to explore.
## Data Apps
Data Apps allow you to create and manage forms for last-mile data collection and management.
Follow these steps to navigate the Data Apps module
1. Click on the [Data Apps](/data-application/ngaugeforms-summary/) module in the Infoveave menu.
2. Create a new form or manage an existing one.
## Data Quality
Data Quality helps you run checks to ensure data completeness and correctness before analysis.
Follow these steps to navigate the Data Quality module
1. Click on the [Data Quality](/data-quality/) module in the Infoveave menu.
2. Create a new Data Quality check or manage an existing one.
## Data Governance
The Data Governance module helps you organize and manage data using domains, tags, and tiers. Domains categorize data. Tiers prioritize data based on sensitivity. Tags enable flexible labeling for easier filtering and analysis.
## Studio
The Studio module empowers you to design and manage various data-related elements.
Follow these steps to navigate the Studio module
1. Click on the [Studio](/studio-v8/datasources/) module in the Infoveave menu.
2. Access sections like [Datasources](/studio-v8/datasources/), [NGauge Forms](/data-application/ngaugeforms-summary/), [Infoboards](/studio-v8/infoboards/), [Reports](/insights-v8/insights-layout/download-infoboard-reports/), [Lists](/insights-v8/insights-layout/insights-lists/), [Queries](/studio-v8/queries/query-editor), [Media Manager](/studio-v8/media-manager/), and [Folders](/studio-v8/folders/).
3. Click on the section you want to explore.
## Administration
The Administration module manages system settings and user roles.
Follow these steps to navigate the Administration module
1. Click on the [Administration](/administration) module in the Infoveave menu.
2. Access sections like [Roles](/administration/roles/), [Users](/administration/users/), [Audit Logs](/administration/audit-logs/), [Address Book](/administration/address-book/), [Custom Calendars](/administration/custom-calendar/), [Holiday Calendar](/administration/holiday-calendar/), and [Control Center](/administration/control-center/).
3. Click on the section you want to explore.
## Notifications
The notification panel provides updates about successes, failures, and activity status.
Follow these steps to manage notifications
1. Click on the **Notification Icon** to view all notifications.
2. Use the **Search bar** to search for specific notifications.
3. Click on the **View** button to see details.
4. Use the **Delete** icon to remove notifications.
5. Click the icon to refresh the list.
6. Click **Download** to download associated reports.
7. Click **Disable Notification Popup** to turn off popups for the current session. Notifications will reappear after you log in again.
## Help
Infoveave Help provides step-by-step guidance for using platform features.
Follow these steps to access Help
1. Click the **Show Help** icon to access context-specific help.
2. Use the same icon to browse help content for other modules.
## Catalogues
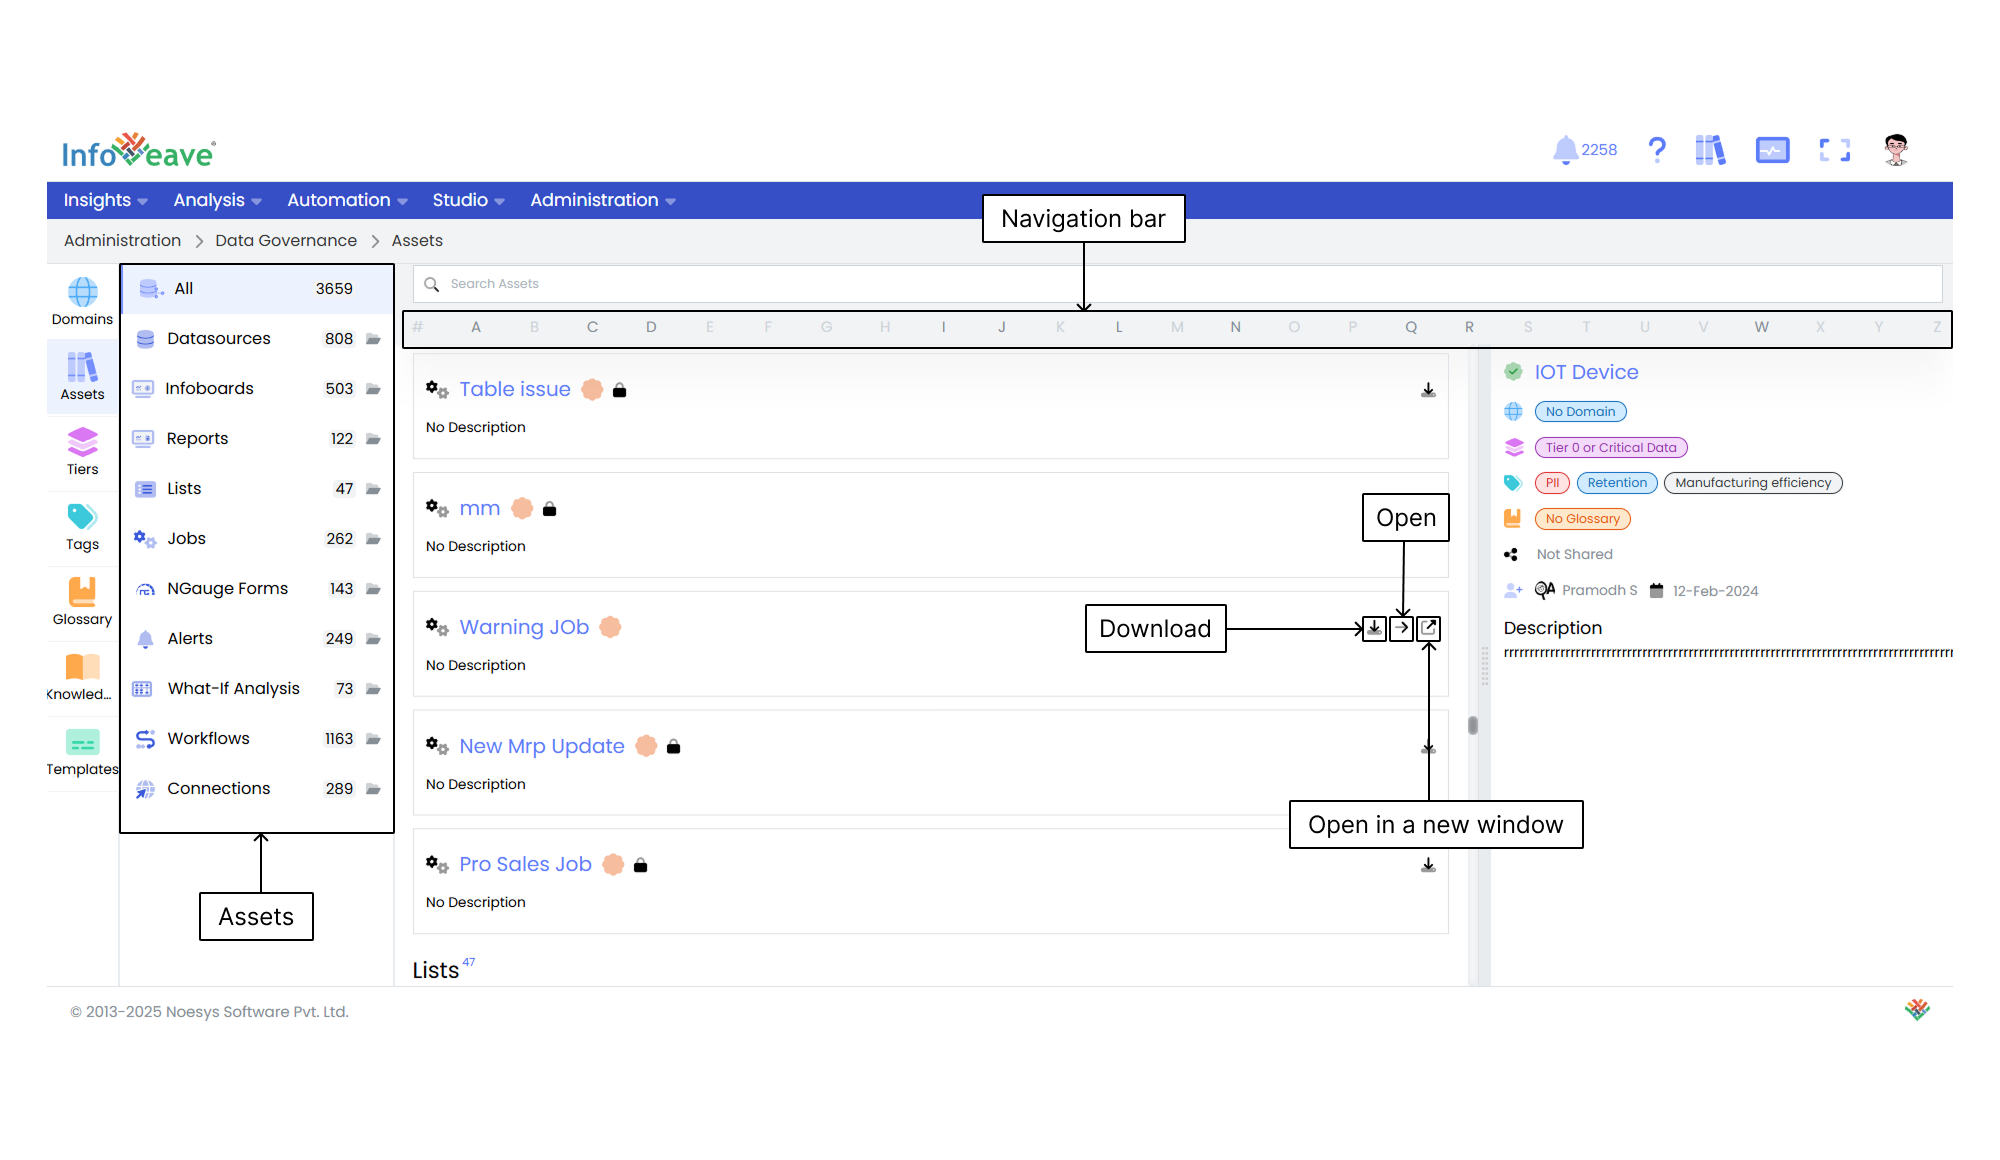
Catalogues offer a structured way to manage assets like **Datasources, Infoboards, Reports, Lists, Workflows, NGauge Forms, Alerts**, and **What-If Analysis**. Features include **Alphabetical Navigation**, **Export/Import**, and opening assets in new windows.
## Workflow Execution Status
The Workflow Execution Status feature helps you monitor workflows in real time.
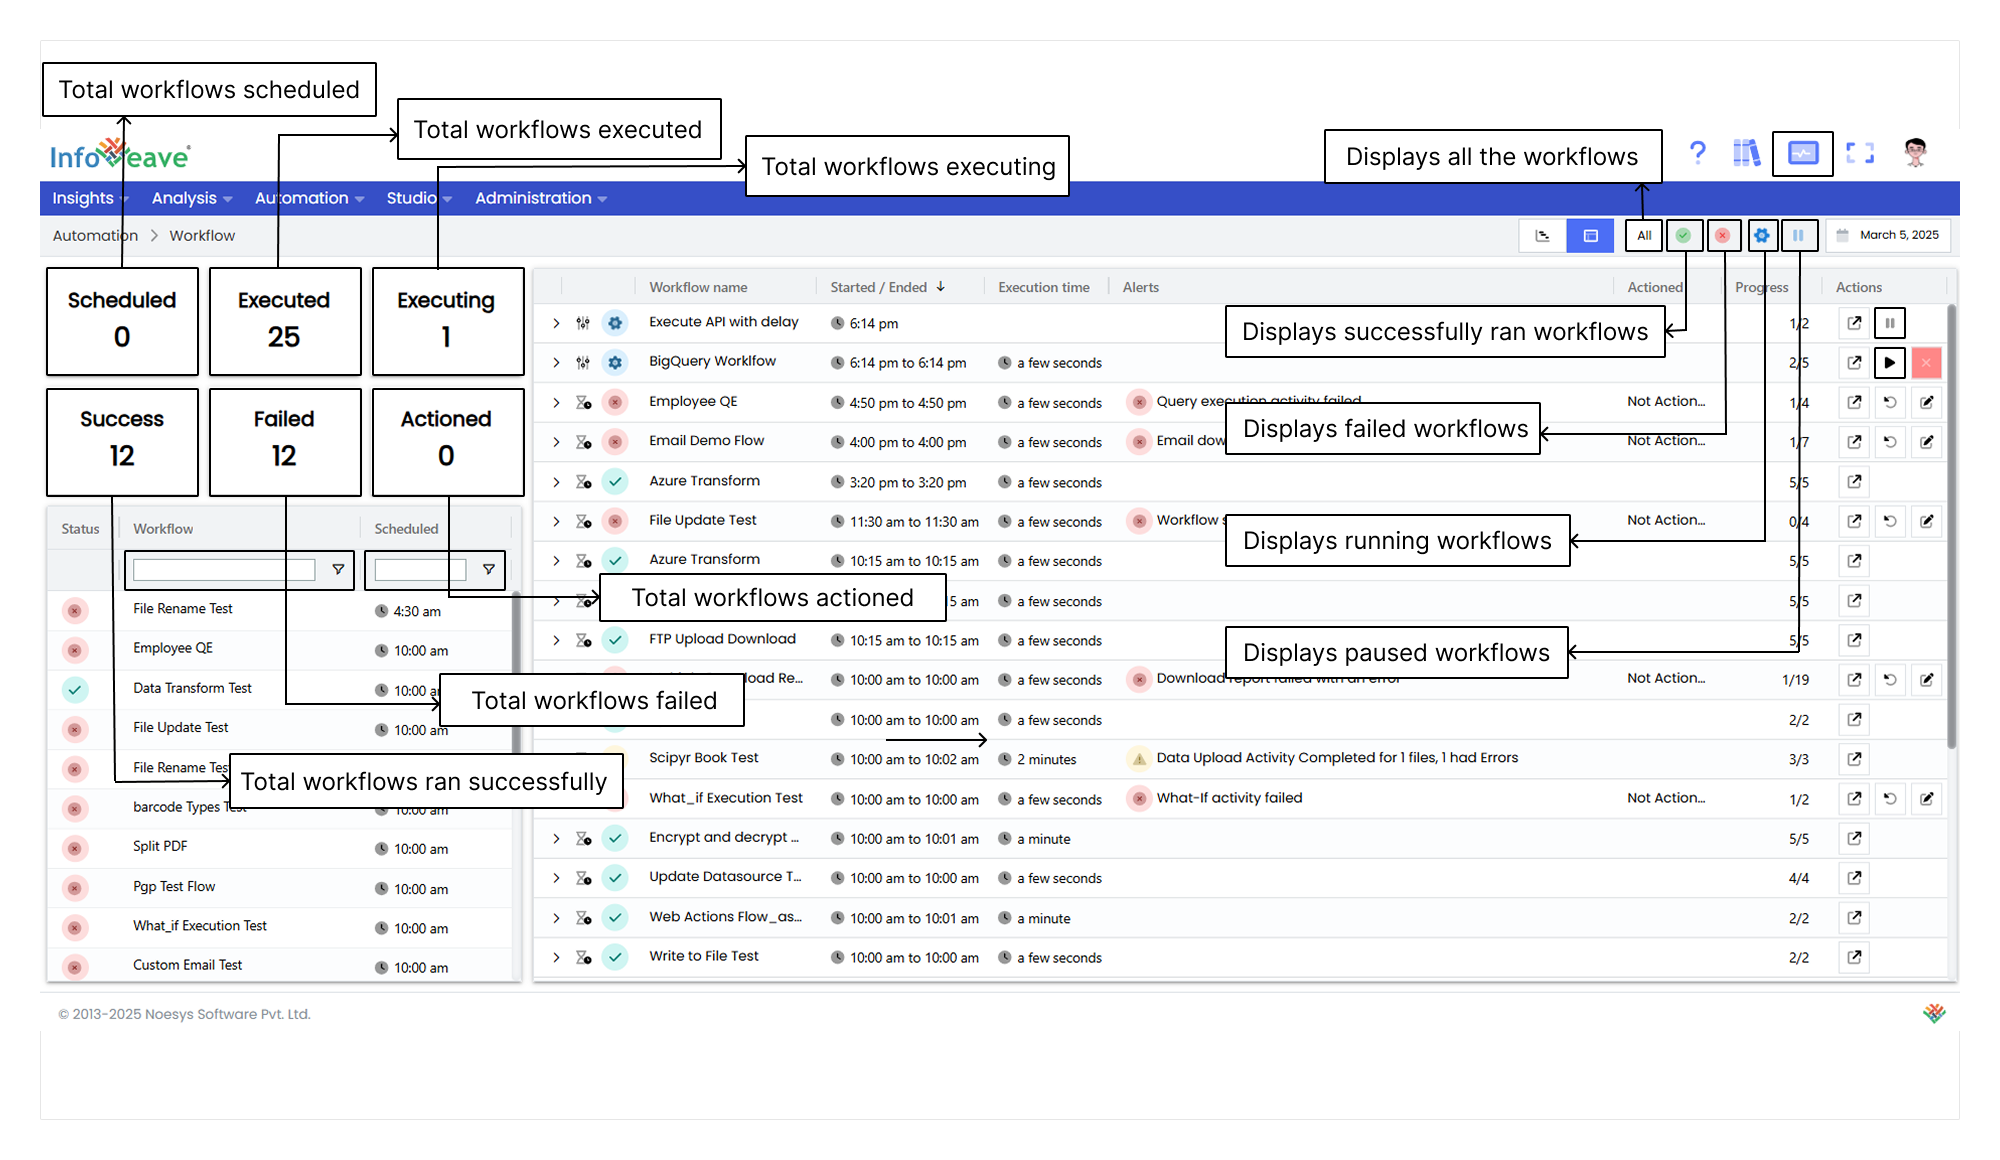
### Key features and functionality
**Accessibility**
Access the tool from the Infoveave toolbar.
**Statuses**
**Success** shows completed workflows with details.
**Failure** shows failed workflows and reasons.
**Running** shows workflows in progress and allows you to pause or manage them.
**Navigation**
- Use **date filters** to isolate and review workflows that are executed within specific timeframes.
- Switch to the **Gantt Chart View** to visualize dependencies between workflows. Manage them effectively by pausing, re-running, or editing as needed.
- The **Table View** provides a detailed overview that helps you access instance history, re-run workflows, or make necessary edits.
- Navigate to the **Workflow Instance History** to view a detailed record of past executions. This helps in performance analysis and issue resolution.
**Actions**
- **Re-run** lets you execute failed workflows again. This helps maintain continuity and resolve issues effectively.
- **Edit** allows you to mark workflows as "Actioned" and document the reasons for failure. This maintains a clear audit trail for troubleshooting.
- **Pause** gives you the option to temporarily stop ongoing workflows directly from the Gantt Chart View. This provides better control over workflow management.
- The **Run** icon helps you re-execute workflows immediately, ensuring smooth and continuous operation.
The Workflow Execution Status feature is an important part of Infoveave. It helps you maintain operational efficiency, resolve issues quickly, and ensure smooth execution of workflows.
For detailed steps, visit [Workflow Execution Status](/automation-v8/workflow-execution-status/)
## Profile
The Profile section lets you manage your personal settings.
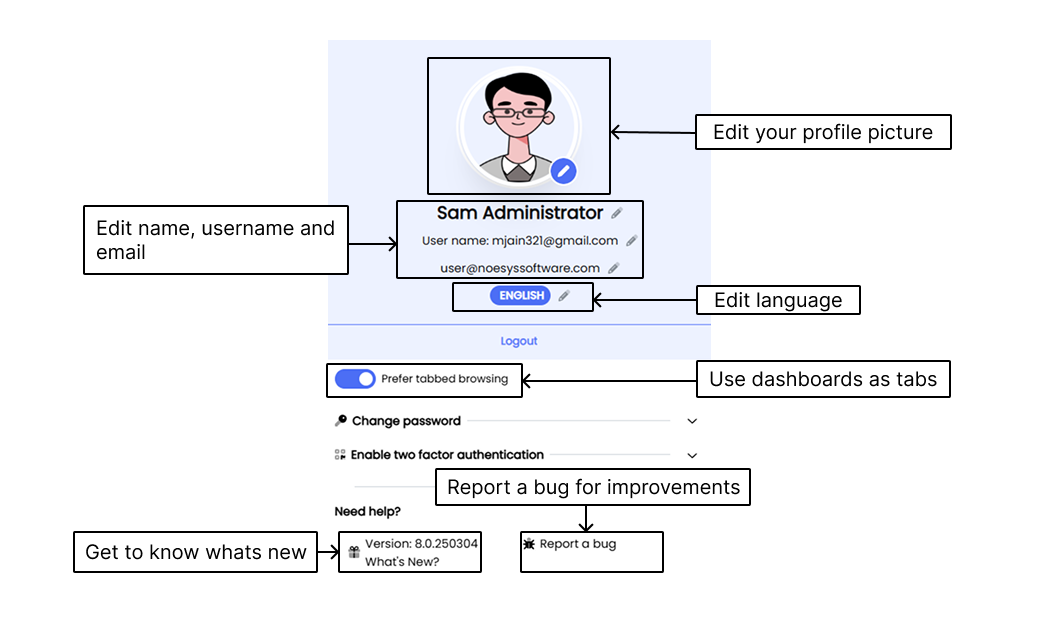
### Editing profile picture
The Edit Profile Picture feature in Infoveave allows you to personalize your profile by uploading or changing your profile picture.
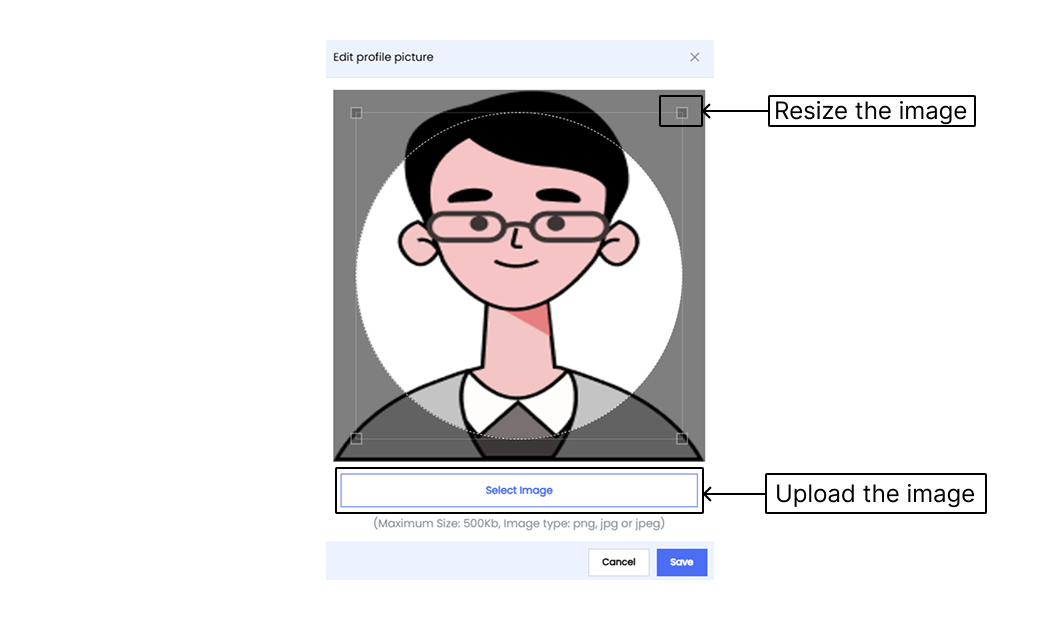
1. Go to your profile.
2. Click **Edit Profile Picture**.
3. Choose an image from your device.
4. Crop or adjust the image if needed.
5. Click **Save** to apply changes.
6. Check your profile or avatar for the updated image.
### Editing profile
Click the pencil icon to change your name, username, or email.
### Selecting language
Choose your preferred language from the dropdown. Available options include **English, French, Arabic, Chinese, Kannada, Hindi**, and **Japanese**.
### Logout
Click the **Logout** button to securely end your session.
### Tabbed browsing
Enable **Prefer tabbed browsing** to open Infoboards as tabs.
### Changing password
The **Change password** feature in Infoveave allows you to update your existing password. This ensures that your data and personal information remain protected.
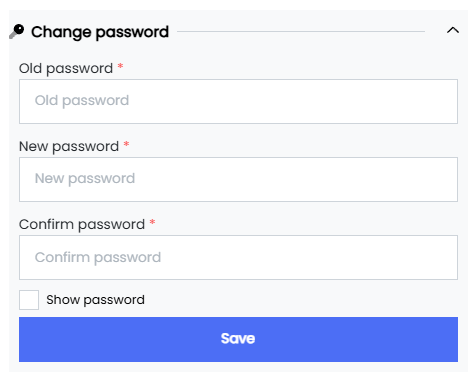
1. Click **Change Password**.
2. Enter your current password.
3. Enter your new password.
4. Confirm the new password.
5. Click **Save**.
6. A success message will confirm the update.
### Enabling two factor authentication
The **Two-Factor Authentication** feature in Infoveave provides a robust layer of security. It reduces the risk of unauthorized access and ensures that your interactions with the platform remain private and secure.
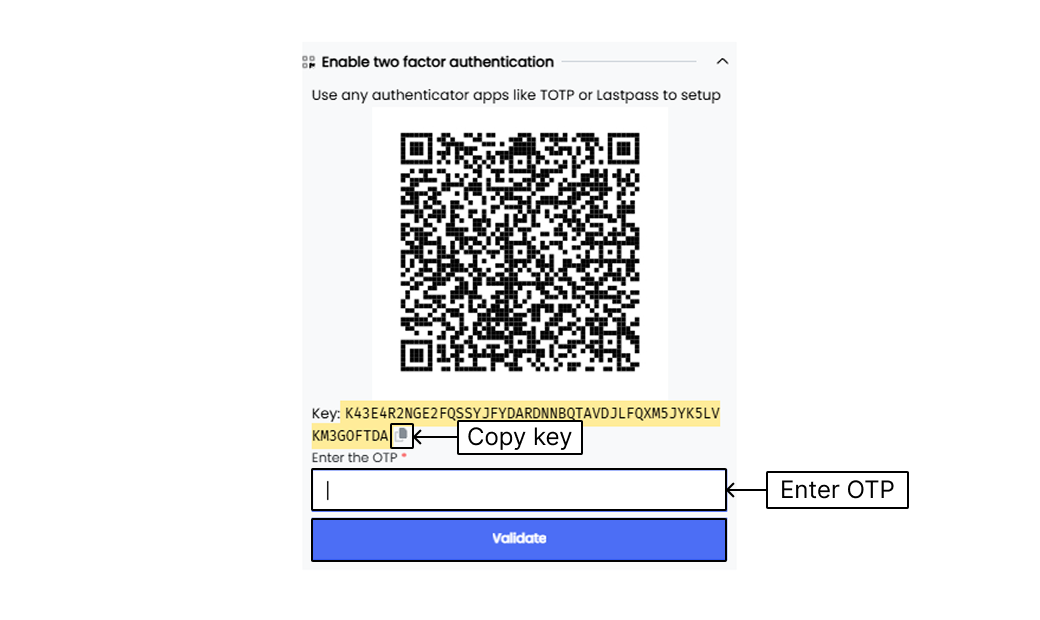
1. Install an authenticator app like TOTP or LastPass.
2. Open the app and add a new account.
3. In Infoveave, click **Enable two factor authentication** .
4. Scan the QR code or enter the secret key.
5. Enter the generated OTP.
6. Click **Validate**.
7. A success message will confirm activation.
### What's new
Stay updated with the latest features added to Infoveave.
### Reporting a bug
The Report a Bug feature in Infoveave allows you to contribute to the continuous improvement of Infoveave. You can report any issues, glitches, or unexpected behaviour that you encounter.
1. Click **Report a bug** in the profile section.
2. Enter a detailed description regarding the bug.
3. Optionally, use **Attach File** or **Take Screenshot**.
4. Click **Send Request**.
5. The support team will review your report.
6. Use **Ask a question** or **Suggest a new feature** for feedback.